include data='blog' name='all-head-content'/> Airboxlights.com and Conviction Films on Lighting for Film and Video: December 2011

Wednesday, December 14, 2011

Adding diffusion to your Airbox

The Airbox has a good base diffusion level, but if you want to diffuse it further, here are the steps you can take so that you have an additional layer that's ready to go on or come off the Airbox rapidly.

1.  Cut a 9" x 9" square of the diffusion you desire.  I recommend quarter or half white diffusion.

2. Cut four 1 1/2" strips of loop velcro.

3. Affix strips of loop velcro to corners of diffusion square.
4.On reverse side of diffusion square, affix 4 strips of hook velcro in the corners to enable you to attach the eggcrate on top of the additional diffusion should you need it.

5. Using corner strips of velcro, attach diffusion square to 1" round circles of hook diffusion on front of Airbox and check for fit.


Please email any questions to airboxlights@gmail.com

Airboxlights.com


Airbox operating instructions

Step 1: Set up your Litepanel.
Step 2: Inflate your Airbox.


 Step 3: Cut two 1" strips and one 3" strip of hook velcro.

Step 5: Attach 3" strip of velcro to center of top of Litepanel. 
Step 6: Attach 1" strips of velcro to bottom of Litepanel about 1/2" in from each side.


Step 7: Mount Airbox to Litepanel.


Please email any questions to airboxlights@gmail.com

Tom
Airboxlights.com

Friday, December 9, 2011

matting a subject into an existing background and matching the light.

When you're matting the subject of your shoot into a plate of an existing background from another prior shoot, I think what gives away the fakery the most is if the lighting doesn't match.  I will show you a little homegrown experiment in attempting to make two people shot in a "studio" look like they were lit by the same light as was falling in an earlier outdoor situation.
This is the original situation, a meadow on Martha's Vineyard.  Much more scenic a background than my living room.


It is handy to have some kind of reference for what the light was like in the earlier situation. That is something I didn't have. The closest thing to that I have is the tree on the right side of frame.  Looking at the tree, you can see that there was warm, hardish light falling on it that is kind of sidey or three-quarter backy. It's shadow side is pretty dark, but that's a detail I chose to not imitate as faithfully.

The need to have an accurate reference is why the special effects guys shoot a few frames of a little painted ball and a reflective sphere in the same lighting setup as you just shot the live action.  It shows them what and where the lights were, and how they looked on the subject. The mirrored chrome  phere shows them all the lights, and the painted ball shows them what the direction and quality of light was falling on the talent.

Lacking any reference for the viewer in frame can be handy too, since if you've fudged it a lot, no one will know. In this situation, the tree and the hillside are the only reference points the viewers will have. All the viewer will know is a sense of warm light, coming from a low angle, sidey and backy,  relatively hard. The wash over the grass on the hillside even suggests that the light isn't necessarily that hard.

Since I was lighting a portrait, I chose not to be entirely faithful to the light in the photo.  Hard sidey late-season light  with a deep shadow side might not be the most flattering thing for a holiday portrait.

The studio setup:


Not fancy.  A bit awkwardly narrow. But it worked.

If we were shooting motion and not stills, it would have to be a greenscreen (not blue because she has blue eyes and I had on a purple shirt) and be pretty evenly lit.  Still are much more forgiving, so a purple bedsheet worked out fine.

I used the two kinos at the left rear to make a large wrappy 3/4 back source, 2900 bulbs plus 1/4cto and light grid cloth. The key is a 3' chimera Octaplus with a 1k bulb and 1/2 soft frost over the face. I didn't use the stock diffusion that comes with it, I clipped a layer of half soft frost to it so it wouldn't get too soft,  retaining some of the specular quality of the bare bulb and silver reflector inside.  All the light in the landscape frame is on the hard side, and I didn't want the key light to jump out at the viewer as being overtly different. I had a large 12' black negative fill taking the shadow side way down, killing all the bounce from the whitish wall, but it ended up looking too gloomy and noir, so I ended up furling it out of the way and adding a 1x1 litepanel instead as an eyelight. I chose not to go as hard as the real sun in the picture because I thought I could get away with it and that it would be more flattering on my wife's features. There's no obvious frontlight source in the landscape photo, but all the lit background areas are distant enough from the lens that the viewer really doesn't know what's close to the lens. Perhaps a soft 3/4 front key could even make sense...

Here's the pre-edit photo from the shoot:


And here's the final result.
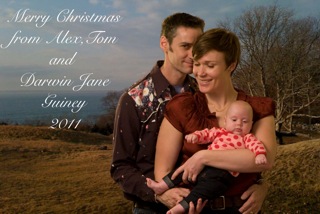
There is a greenish kick on Alex' camera right cheek and neck that comes from the landlord-chosen semi-white wall paint, but I left it in since it seems to work, echoing the yellow-green grass we also see on frame right. The edge on the back of my head and shoulder are consistent with what we see raking across the grass. The key level is a bit brighter than is absolutely believable given where we know the sun is, but hey.  I wanted us to look nice.

So how successful is the fakery? Important question is how successful does it need to be for the client's purposes. In this case, the client is me, and the target market is friends, family, and colleagues with whom I want to keep in touch with.  A forgiving bunch, generally. Not one where you get a lot of clients furrowing their brows and reaching out to touch a certain little spot on the monitor.  Knowing where the image is headed gave me the leeway to light it more flatteringly and a little less realistically, and it's important to know how strictly realistic it ought to be. Choose your battles.

Tuesday, December 6, 2011

Supersimple interview lighting setup-

The credit here goes to Art Adams, from whose blog I got this:

http://bit.ly/t67I31

I've been lighting interviews for years, but never have I come across an incredibly fast way to do it that's as effective as this.  One light, one 4x4 bounce, one 4x4 solid, possibly with some white clipped or taped to it.  I think  it demands a big of work to separate the (stand-in)subject from the background, but for 3 stands, one light, one bounce, 5-ish minutes, this can't be beat.

High speed

Tidbits about shooting with a phantom flex:

1- its much better on tungsten sources flickering than the older Phantom gold.  The Phantom gold had a less precise shutter, measured in multiple decimal places, but now the Flex has it more precise, resulting in less strobing from smaller tungsten sources.

2- 1k Par-64s are ok for high speed! To be fair, what you're pointing the light at is going to have a lot to do with how much you see any intensity variation from the cycling of AC power through a filament.  We were using the VNSP 1k pars as 3/4 back edges on a tumbling cascade of pigment, so it would have been hard to tell if there was a flutter no matter what we were using. Tumbling flakes of gold pigment?  Yeah you might not see it there.

That could be a useful thing to think about:  You're going to see the merest amount of variation in frontlight on a flat white background, but on something that's moving and has shifting reflections on it, you'll be relatively unlikely to see it. If hard pressed, you might even dare to try using an HMI if you had nothing else... 

Thursday, December 1, 2011

Hi-speed shooting, tungsten filaments, and flicker/pulse

Tweeted on the topic of high- fps shooting today.  More info here:

It is commonly understood that when you're shooting above 120 fps, you can't use small lights, that a 5k is the smallest light that you can use.  Why? In brief, because a smaller, thinner filament can cool and therefore dim quickly, as the AC voltage cycles up and down 60 times per second on a 60-hz system.  To the eye, and a normal framerate, the very brief dim period of out put in between +120volts and -120volts that happens 60 times each second isn't visible at all, the same way you can't see hummingbird wings or helicopter blades.  When you're shooting extremely high speed, these "brief" dim periods are extremely obvious, and the lights that appear steady to your eye appear to be pulsing in a very odd way.  With larger, thicker filaments, like on a 10k or 20k, it takes a much longer time for the heat and light to dissipate out of the metal, and by the time the filament would be noticeably darker, the voltage has already reached it's next peak and the brightness of the filament is restored.

Today it was pointed out to me by a DP I'm about to work with that the "nothing under 5k" rule is actually a conservative overcompensation(a little typical of us gaffers and electricians, I think).  I've pulled maxibrutes (9 x 1k Par-64 bulbs) off of an order because I heard that we were adding a bit of high speed.  Jim Matlosz (Www.dpmatlosz.com) clearly knows what he's doing, if you look at his site, and he said, "Yeah, you get away with it sometimes. 1ks?  Yeah. I've seen them flicker, and I've seen them not. We'll try it." But in any case, he firmly asserted that 2k is the safe smallish light, not 5k.  

Regular tube-shaped kinos are fine when they're bright enough, because kino ballasts ramp up the frequency of the current to about 10,000 hz.  Interestingly, the u-shaped kinos like diva lights, parabeams, and vistabeams are problematic sometimes.  That requires further research; I don't know why they aren't fine and the straight tubes are.  They must use lower-frequency ballasts.

"Flicker-free" HMIs:- those arent really flicker free.  Their brightness still increases and decreases 60 times per second, but they become "flicker-free" by squaring off the top of the AC sine wave.  The amplitude(height) of the wave is increased, but a filter is applied that cuts off the top of the wave beyond a certain point, which gives you an almost completely flat-topped, steep-sided waveform, almost a true square wave.  This results in seeing the maximum brightness for a relatively longer time out of each cycle and having the transition between brightness peaks be relatively brief.

In any case, don't use flicker free HMIs at a framerate higher than 150 fps. Some people say 120, but that might be just staying on the safe side.

yours
Tom Guiney, gaffer and DP
Airboxlights.com inflatable LED diffusers for Litepanels
twitter lighting tips @airboxlights